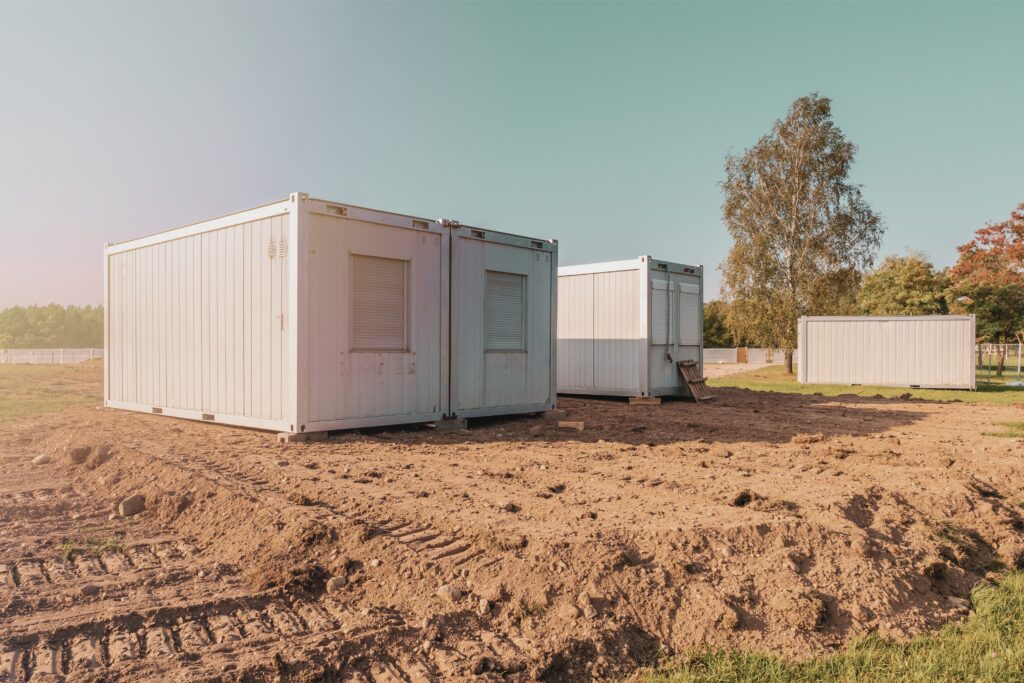
How to Tie Down & Anchor Office Trailers in Florida Wind Zones
A strong Florida wind crashes into your office trailer on a construction site. These trailers need solid anchoring to hold in place, but the wind tears it loose like a kite caught in a storm. In hurricane country, one unsecured unit without proper securing trailers can mean disaster-lost work, legal headaches, and sky-high repairs. You will learn Florida’s wind zones, anchors that meet code such as helical piles according to ASCE 7 standards, site preparation methods from an installation guide, and the steps to install tie-downs for getting ready for storms and hurricanes so your setup stays secure. Ready to storm-proof?
Importance of Wind Resistance in Hurricane-Prone Areas
You face winds up to 180 mph in Florida’s High-Velocity Hurricane Zones (HVHZ) like Miami-Dade county, where unanchored office trailers can lift off foundations, as evidenced by NOAA’s post-Hurricane Andrew reports showing 70% failure rate for unsecured mobiles based on failure analysis.
To reduce risks, follow ASCE 7-22 standards. These standards multiply basic wind speeds by 1.6 for the gust factor in loads that vary with time on buildings.
Exposure categories classify sites: B for urban areas with obstructions reducing wind, and C for open terrain allowing full velocity.
Use this expanded inspection checklist with safety guidelines to assess risks, including maintenance tips.
- Map site exposure per ASCE using installation tools;
- Inspect anchors and ties for 180 mph rating, considering DIY anchoring options;
- Evaluate roofing and walls for uplift;
- Install FEMA P-361-compliant safe rooms;
- Simulate loads using tools like ETABS software for wind load calculations;
- Develop storm preparation and evacuation plans for emergency response.
A Fort Myers trailer survived Hurricane Ian’s 130 mph gusts via hurricane straps and concrete footings, per FEMA reports, with post-storm inspection and repair procedures using replacement parts, preventing total loss.
Overview of Office Trailers and Their Vulnerabilities
A typical 8×40-foot office trailer weighs 10,000 pounds on an I-beam chassis. Without proper anchors, even with supplementary ballast weights and wheel chocks, winds at 50 psf can lift it up, just like the weaknesses shown in Red Cross checks after Hurricane Michael.
Key vulnerabilities include four weak points per Florida Building Code (FBC 2020, Chapter 16):
- Roof edges: Fail under uplift via panel lift-off; shear causes edge tearing.
- Sidewalls: Uplift buckles panels vertically; shear leads to lateral sliding.
- Undercarriage: Uplift detaches from chassis; shear twists I-beams.
- Tie-down connections: Uplift snaps anchors; shear shears bolts.
To mitigate, reinforce with galvanized steel brackets (4×4-inch, 12-gauge) using 1/2-inch diameter x 6-inch bolts with torque specifications, spaced 4 feet on-center at anchor points for bolt-down methods. Implement frame reinforcement, skirting ties, roof anchors, wall bracing, cross-bracing, and diagonal braces for securing trailers.
Reference ASCE 7-22 Figure 29.5-1 for uplift diagrams, ensuring FBC-compliant anchoring to resist 50 psf loads.
Understanding Florida Wind Zones
Florida’s wind zones vary from 130 mph in inland areas to 170+ mph along the coast, dictating anchor requirements under the 2020 Florida Building Code to protect structures like your office trailer from catastrophic failure. Explore used construction trailers for sale in Florida that comply with these standards for added peace of mind.
Florida Building Code Wind Provisions
The 2023 Florida Building Code (FBC) Section 1609 mandates wind design speeds of 140-180 mph for Risk Category II structures like office trailers, requiring anchors to resist 30-60 psf uplift in HVHZ areas.
To comply, follow these 5 key FBC rules:
- R301.2.1: Base designs on the wind speeds from ASCE 7-22 maps, and check them with local hazard tools.
- R301.2.2: Install tie-downs every 4 feet along perimeter walls using galvanized straps, cable tie-downs, ratchet straps, and tie-down kits rated for 3,000 lbs load ratings, incorporating guy wires, turnbuckles, and shackles.
- R301.2.3: Secure roof-to-wall connections with hurricane clips (e.g., Simpson Strong-Tie H2.5A).
- R301.2.4: Use uplift-resistant anchors like helical piles, earth screws, deadman anchors, auger anchors, ground anchors, concrete anchors, adhesive anchors, expansion anchors, wedge anchors, and sleeve anchors penetrating 12 feet into soil with appropriate drilling depths and embedment length to meet foundation requirements.
- R301.2.5: Use breakaway walls in flood zones as required by ASCE 24.
Compliance checklists and best practices:
- Test the soil at the site to check its conditions;
- Obtain engineer-stamped plans with engineering specifications through expert consultations or training courses;
- Certify installation by licensed contractors for professional installation;
- Perform post-install pull tests for pull-out resistance and lateral resistance;
- File with local AHJ, following zoning regulations and permit requirements.
A University of Florida study on Hurricane Irma showed code adherence reduces structural failures by 85%.
Wind Speed Maps and Zone Designations
Use the ASCE 7-16 Hazard Tool online to pinpoint your site’s basic wind speed-e.g., 150 mph in Tampa’s coastal zone vs. 130 mph inland-guiding anchor specs for your trailer’s 20×8 footprint.
For accurate mapping in Florida, visit the DBPR’s FBC Wind Map Tool at myfloridalicense.com. Follow these steps:
- Input your site’s latitude and longitude.
- Get the maximum design wind speed from the interactive map.
- Adjust for exposure height using ASCE 7-16 multipliers (e.g., add 10-20% for 30-ft elevations).
In Orlando, expect 140 mph, suitable for standard anchors; Key West demands 170 mph ratings due to hurricane exposure, as shown in NOAA’s 2022 data reporting Category 4 winds up to 165 mph in similar zones. This ensures trailer stability against gusts.
Key Factors Influencing Local Wind Loads
Local factors like Exposure C (open terrain) can increase wind loads on your trailer by 20-30%, per ASCE 7’s velocity pressure equation (qz = 0.00256 Kz Kt Kd V^2 I), demanding deeper anchors in sandy coastal soils considering weather considerations and soil conditions.
To assess risks accurately, break down key ASCE 7 factors:
- Exposure: Urban Category B reduces velocity pressure by 20% compared to flat Exposure C, which applies full wind speeds in open areas like beaches.
- Topography: Hills or escarpments multiply Kzt up to 2.0, doubling loads on elevated trailers.
- Gusts For flexible structures such as trailers, apply a gust factor of 1.6 (G) to account for strong wind gusts, varying loads, repeated loading, and wear tests.
- Directionality: Use Kd=0.85 for reduced loads from non-perpendicular winds.
For a 10-foot-high trailer in 150 mph winds, base qz calculates to 45 psf; adjust for factors to reach 60-90 psf. Use SkyCiv’s free wind load calculator to run simulations.
Anchors must go 4-6 feet into sand, as required by coastal building codes.
Regulatory and Legal Requirements
Florida’s strict regs under FBC and local ordinances require permits for anchoring office trailers over 400 sq ft, with non-compliance risking fines up to $5,000 as in Broward County’s 2021 enforcement cases.
Compliance with ASCE 7 Standards
ASCE 7-22 Chapter 29 specifies minimum anchors for temporary structures like your trailer to handle 1.0D + 0.6W loads, ensuring pull-out resistance exceeds 5,000 lbs per point in 150 mph zones.
Follow these steps to comply and anchor securely.
- First, calculate uplift loads per Section 26.7, such as using helical piles that provide 6,000+ lbs resistance per anchor via torque correlation methods and manufacturer recommendations, checking certification marks.
- Second, obtain certification through a Professional Engineer (PE) review, verifying designs against site-specific soil data and supplier contacts for materials.
- Third, run pullout tests according to ASTM D1143 standards to check how it holds up under varying wind loads, including cost estimates and time requirements.
An ASCE case study from Galveston, Texas, showed compliant helical anchors withstood 140 mph Hurricane Harvey winds, reducing structural damage by 90% compared to non-anchored setups.
Permitting and Inspection Processes
In Pinellas County, secure a temporary structure permit ($200 fee) via online portal, submitting anchor plans certified by a FL PE, with inspections at 25% and 100% completion to verify 4-foot spacing.
The process follows a structured sequence per Florida DBPR guidelines for temporary structures under Chapter 489. Follow these steps:
- Provide site plans that include wind load calculations based on ASCE 7-16 standards to meet 130 mph wind zone rules, incorporating seasonal maintenance.
- Pay fees, averaging $150-500 based on structure size and overall cost estimates; Pinellas online portal processes in 3-5 days.
- Schedule pre-pour inspection for concrete anchors to confirm depth and embedment, adhering to safety guidelines.
- Obtain final sign-off post-100% inspection, including any necessary failure analysis.
A Tampa case study showed skipped pre-pour checks caused anchor failure, leading to $10K in demolition and redo costs (DBPR report, 2022).
Insurance Implications for Anchored Structures
Anchoring your trailer and modular buildings to FBC standards can lower premiums by 15-25% via wind mitigation credits, as per Citizens Property Insurance data, avoiding claim denials like those in 2022 Lee County floods.
Qualifying requires documenting compliance via wind mitigation inspection forms, from
- Form A (roof covering, e.g., metal panels rated for 140 mph winds)
- Form B (roof-deck attachment)
- Forms C-G (secondary water resistance and roof-to-wall ties like 1-inch ratchet straps, with required photos of installations)
- Forms H-M (opening protections such as impact-rated shutters)
- Form O (glazing).
For ROI, a $1,000 anchoring investment saves $2,500 annually on premiums, per insurance models.
An Insurance Institute for Business & Home Safety (IBHS) study shows fortified structures cut wind damage by 60%, enhancing resilience.
Assessing Wind Loads for Your Trailer
Assess your trailer’s wind loads using ASCE 7 formulas to determine needs like 8 anchors resisting 3,000 lbs uplift each for a 12×40 unit in 140 mph zones, preventing flips seen in post-Irma debris fields.
Calculating Exposure and Topography Effects
For your trailer’s site in Exposure B (urban), apply Kz=0.70 from ASCE 7 Table 26.10-1, boosting effective wind speed by 10-15%; on a 5% slope, add Kt=1.1 multiplier for topographic uplift.
To calculate full wind loads, follow these steps per ASCE 7-16 guidelines:
- Classify exposure-use C for open Florida fields (Kz=0.85 at 15 ft height) versus B’s lower velocity.
- Adjust for height: At 15 ft, Kz=0.85 increases pressure by 15-20% over ground level.
- Apply topographic multiplier from Figure 26.8-1-Kt=1.1 for 5% slopes amplifies uplift, as shown in NIST’s 2010 hurricane study on coastal effects.
Use the free ASCE Hazard Tool: For a 130 mph base speed in Florida wind zones, add 20% topographic factor to reach 156 mph effective speed, ensuring trailer anchoring meets code.
Determining Trailer-Specific Load Requirements for Trailer Tie-Downs
Your 10,000-lb trailer’s center of gravity at 4 feet height requires anchors sized for 40 psf lateral loads (shear forces) and 60 psf uplift forces, calculated as qh * GCpf * Af per ASCE 7-22, totaling 12,000 lbs resistance.
To determine anchor needs for DIY anchoring, follow these steps:
- Measure dimensions: For a typical 14 ft x 56 ft trailer, tributary area Af is 40 ft L x 8 ft (half-width), yielding 320 sq ft per side.
- Compute loads: Using V=140 mph wind speed including gust factors, qh=35 psf base pressure; apply GCpf=1.1 for uplift (60 psf total) and 0.8 for shear (40 psf). Example: Uplift force = 60 psf x 320 sq ft x 0.6 (dead load factor) = 11,520 lbs.
- Factor resistance: Divide by anchors (e.g., 10 total): each needs 1,200 lbs pullout capacity. Use helical anchors like CHANCE SS175 (5,000 lbs rating) per manufacturer specs.
Download FEMA P-85 spreadsheet template for automated calculations, ensuring compliance with HUD standards, insurance requirements, and FEMA guidelines for mobile homes. Total setup: 2-4 hours with basic tools.
Selecting Anchoring and Tie-Down Systems for Coastal Areas and Inland Wind Zones

Choose systems like helical anchors (e.g., Chance 1.5-inch shafts) paired with 1-inch polyester straps rated 5,000 lbs for your trailer, ensuring compliance with Florida building code (FBC) for 150 mph resistance without soil failure.
Types of Ground Anchors (Helical, Drive, etc.)
Helical anchors like GoliathTech’s 2.25-inch models screw 10-15 feet deep for 10,000 lbs pull-out in sandy soil, outperforming drive anchors (e.g., 18-inch steel stakes) which suit clay but risk corrosion in Florida’s humid climate.
| Type | Depth | Capacity | Best For | Pros/Cons |
|---|---|---|---|---|
| Helical | 10-15 ft | 10,000 lbs | Sandy soil | Pros: Corrosion-resistant galvanized steel, no soil spoil; Cons: Requires torque wrench ($200+) |
| Drive | 1-2 ft | 5,000 lbs | Clay soil | Pros: Quick hammer install; Cons: Prone to rust in humidity, lower hold |
| Arrowhead | 5-10 ft | 8,000 lbs | Loamy soil | Pros: Expandable for grip; Cons: Site disturbance during driving |
| Duckbill | 3-8 ft | 7,500 lbs | Soft soil | Pros: Low-cost ($20 each); Cons: Limited depth, pulling risks |
For beginners, helical anchors install more simply than arrowhead types. Screw them in place with a hydraulic torque wrench set to 5,000 ft-lbs for a firm hold, without needing heavy machinery.
Arrowheads require pounding and expansion, which can be imprecise in variable soils.
Both meet FDOT standards for coastal applications, per FM 5-520 guidelines, but helices provide verifiable torque data for load confirmation.
Tie-Down Straps, Cables, and Hardware Options
Opt for 1-1/8 inch wide polyester ratchet straps from Keeper (5,320 lbs break strength) or 1/4-inch galvanized steel cables with turnbuckles for your trailer’s I-beams, tensioned to 500 lbs per ASCE guidelines.
Polyester straps outperform nylon in UV resistance and lower stretch (under 7% elongation), ideal for outdoor exposure, while nylon suits indoor or wet conditions but frays faster. Choose 7×19 strand cables with a minimum breaking strength of at least 3,000 lbs to manage varying loads.
Essential hardware includes galvanized S-hooks (1/4-inch diameter) and thimbles to prevent kinking.
| Trailer Frame | Strap Compatibility | Cable Compatibility |
|---|---|---|
| Steel I-Beam | Excellent (direct wrap) | Optimal (with clamps) |
| Aluminum | Good (use protectors) | Fair (add padding) |
| Wood | Poor (risk splintering) | Good (thimble required) |
FEMA guidelines call for yearly checks for fraying or corrosion. Approved products like Keeper straps meet Miami-Dade county and Broward county NOA standards for high-velocity hurricane zones (HVHZ), ensuring 150 mph resistance.
Compatibility with Soil Types in Florida
In Florida’s sandy soils (SP classification), use helical anchors extended to 15 feet for 4,000 lbs resistance, avoiding concrete deadmen that shift in high water tables, per US Army Corps geotech manual.
For clay soils (CL/CH), opt for driven anchors at 8-12 feet to achieve similar resistance, as they penetrate dense layers effectively without excessive torque. In limestone formations (common in central Florida), install rock bolts grouted to 10-15 feet for stability against karst voids.
Selection guide: Do pull-out tests according to ASTM D5333 to check capacity.
For Panhandle sands, multiply depth by 1.5 using UF/IFAS soil survey data so loads go above 4,000 lbs with little deflection. Consult local geotech reports for site-specific adjustments.
Gathering Materials and Tools
Stock up on 8 Chance helical anchors ($40 each) and 12 ratchet straps ($15/pair) from local suppliers like Home Depot, totaling $800 for a standard 40-foot office trailer setup.
Essential Equipment List
You’ll need a 1,000 ft-lb torque wrench (e.g., Southwire model, $150), post hole digger for stakes, and level for alignment, plus PPE like gloves and goggles for safe DIY installation.
- Auger: Rent a gas-powered one from Home Depot for $50/day to speed up digging deep holes for secure anchoring.
- Always wear a safety harness when working at heights. Pick a full-body harness that costs $80 and complies with OSHA 1926 standards for temporary structures. It prevents falls.
- Measuring tape: A 25-ft Stanley model ($10) for accurate stake spacing-aim for 8-10 ft intervals.
- Laser level: Bosch GLL 55 ($150) for plumb alignment; put it on a tripod for accuracy.
- Hammer drill with bits: DeWalt kit ($120) for pre-drilling concrete if needed.
- Anchoring cement: Quikrete fast-set ($15/bag) to stabilize posts in holes.
- Common mistake avoidance: Never over-torque anchors beyond 900 ft-lb, as it snaps them-use a calibrated gauge and check torque in 100 ft-lb increments.
- Reference: Follow OSHA 1926.451 for scaffold-like temp setups, ensuring all braces are inspected daily.
Sourcing Durable, Code-Compliant Materials
Source from Anchor Products Inc. for NOA-certified helical piles (Miami-Dade approved, $45/unit) via their site or Grainger, checking reviews for 4.5+ stars on corrosion resistance in salty air.
Follow these steps to comply:
- Verify FBC/NOA labels online via the Miami-Dade County Notice of Acceptance database (nodamiami.com).
- Compare suppliers like Anchor ($45/unit) versus LB Post ($30-60/unit), factoring in shipping and warranties-LB often edges out on bulk deals per ICC-ES reports.
- Order starter kits, such as 4 anchors plus galvanized straps for $300 from Grainger.
User reviews highlight reliability:
- ‘Chance helical piles hold 12K lbs in sand-5 stars’ (Home Depot);
- ‘Goliath series resists corrosion in coastal zones-4.8 stars’ (Amazon);
- ‘Ideal for hurricane-prone areas, no settling after storms-4.7 stars’ (Contractor forums).
For bulk orders (10+ units), negotiate 15-20% discounts directly with Anchor, saving up to $200 on large projects.
Site Preparation Steps and Risk Assessment
Prepare your site by testing soil bearing capacity (min 2,000 psf) and clearing a 50×10-foot area, ensuring level within 1 inch for your trailer’s stability against 20-degree wind gusts, with case studies showing improved outcomes in similar setups.
Soil Testing and Ground Evaluation
Dig a 12-inch hole with an auger, fill it with water, and check if it drains in 1 hour for sandy soil. Or pay a geotech $300 to use the Standard Penetration Test (SPT N=10+) and check 3,000 psf capacity.
To assess soil suitability further, follow these numbered steps:
- Perform visual identification: Distinguish sand (coarse, drains quickly) from muck (fine, holds water) by digging shallow test pits.
- Use a hand auger to make a probe yourself down to 5 feet. Watch for how much pushback you get and how wet the soil is. This gives a good first check of the site.
- Opt for a professional test per ASTM D1586 standard, which measures soil shear strength through triaxial compression, costing $500-$1,000.
- Report calculated loads for safe foundation design.
For instance, a Florida DEP study (2020) found poor soil caused 20% anchor failures in coastal sites, underscoring the need for thorough testing to avoid structural risks.
Clearing and Leveling the Placement Area
Clear vegetation and debris from a 10-foot perimeter around your trailer site using a bobcat (rent $200/day), then level with gravel base (4 inches compacted) to achieve <1% slope for even load distribution.
Next, follow these key steps for a stable foundation, per USACE EM 1110-3-136 manual on pavement design.
- Use wooden stakes and string lines to mark a 50-by-12-foot area and define its boundaries.
- Remove topsoil to 6 inches deep using a skid steer loader, ensuring no organic material remains to prevent settling.
- Compact the subgrade to 95% Proctor density with a plate compactor (rent $50/day), testing with a nuclear gauge for accuracy.
- Add and compact a 4-inch gravel base layer in lifts, using a roller for uniformity.
Avoid uneven sites, which can increase shear stress by 15%, risking trailer instability. This process typically takes 2-3 days for DIY setups.
Installation Process for Anchors and Tie-Downs
Follow this 6-step process to install anchors and tie downs on your office trailer, taking 4-8 hours for DIY anchoring or $1,500 professionally, ensuring 360-degree securing against 150 mph winds in Florida wind zones per Florida building code (FBC).
- Position the trailer level and mark 4 corner anchors plus 4 mid-side points (every 10 ft along chassis) using stakes and string lines (30-45 min; tool: measuring tape).
- Drive screw anchors to 12 ft depth with a hydraulic torquer at 2,000 ft-lbs torque (1-2 hrs; rent for $100/day).
- Attach galvanized steel straps to chassis I-beams using 1/2-inch Grade 5 bolts and nuts (45 min).
- Tension straps to 400 lbs via turnbuckles (1 hr; avoid loose tension, which causes 30% of failures per FEMA guidelines).
- Add crosswise bracing with diagonal straps for stability (45 min).
- Inspect for plumb using a torque wrench and level, verifying all connections (30 min).
Watch Anchor Foundation Repair’s YouTube tutorial for visuals. Reference FEMA P-499 guide and ASCE 7 standards for temporary structures to meet code, especially in Miami-Dade county, Broward county, and HVHZ.
About the Author
I’m John Keller, a University of Florida graduate with a bachelor’s degree in Business Management and the owner of Florida Used Construction Trailers. With over 12 years of experience in the industry, I’ve helped hundreds of Florida contractors—from Miami to Tampa—get the reliable jobsite offices they need to stay productive and profitable.